Welcome to the Getting Started Guide!
Click on the links below to navigate the guide. We recommend reading the section as well as
watching the available videos. Links to the videos are
located within the written guide while explanations are being
given. |
|||||||||||||
|
Contents
What you need to do first�
What to do next�
|
Advanced Functions�
Response Magic Tools How do I...? Question not listed here? |
||||||||||||
|
Web Browser:
What you need to do first�
Setting up your Personal Settings
1. Go to Settings then
Personal
Settings and look over your settings to make sure they are
correct.
2. Add your website address to the Website field.
3. Add your website address to the Confirmation URL field. (This
determines the web page that your contacts will be sent to when
they Opt-In to the Confirmation Email. If you leave it blank,
they will be sent to a generic Response Magic �thank you� page.)
4. Click the �update settings� button to save your changes.
1. Watch the
List Settings
Training Video
2. Go to Settings then Personal Settings to view your current
list settings
3. You can add a new list by clicking the �add a list� button.
4. You can edit your current lists by changing the information
for that list and clicking the �update� button.
5. You can change the Name and the Email address that will be
displayed to your contacts on that list when they receive email
from you by changing the fields �from first name�, �from last
name�, �from email�
Example: If I entered in �Jane� �Smith� �janesmith@yahoo.com�
for list #1, the recipients of emails from that list would see
it as coming from that source. If I then put on list #2 �Jane
Smith�, �Working from Home�, �youcanworkfromhometoo@yahoo.com�
recipients of emails from list #2 would see that as the sender.
If you leave those fields blank, they will use the default first
name, last name, and email address that you have set up under
Personal Settings.
Understanding How Your Lists Work
Watch the
List Management
Training Video
The easiest way to understand Lists is to think of each list as
if it were a folder on your computer. If you have 3 lists set
up (we will call them Prospects, Members, and No For Now Leads),
then you have 3 folders, each with a different name. You select
what folder you want to open (or what List you want to work
with) from your home page under List Management. There you will
find a drop-down menu that shows what Lists you have. This menu
is called �Select a List to Manage Below.� By default, every
time you go Home, it will display the contents of your first
list (or folder), which in this case would be Prospects.
Each folder has its own sub-folders. These sub-folders are
called Email Management, Contact Management, Opt-out Management,
and Broadcast. When you Select a List To Manage Below, you will
be opening that folder and displaying the subfolders for that
list. So if I am currently on Prospects list, and I change that
to Members, (by Selecting a List to Manage Below) the page will
refresh, open that folder, and display the Email Management,
Contact management, Opt-Out Management, and Broadcast options
that are related to that list.
What also changes when you change lists is the numbers displayed
These numbers change to reflect the contacts you have under that
list (or, in other words, the contacts that you have under the
Contact Management sub-folder in that List�s Folder) For more
information on what these colors/categories mean, please see the
section on
Contact Colors
and Status.
Setting Up Your Confirmation Settings
1. Watch the
Confirmation
Settings
training video.
2. Go to Settings then
Confirm
Settings to set up your Confirmation Email
3. Choose what list you want to create a Confirmation Email for
(You will need to create a different confirmation email for each
of your lists) by using the drop down menu �Confirmation Email
for List:�
4. Create your Subject Line.
5. Create the Body of your email.
6. Submit your email for approval. All confirmation emails
submitted must be approved by us before they are sent out to
Pending
contacts. For it to be approved, it must follow three rules:
1. No Website Links (www.website.com.)
2. No Advertisements (ex: �You can make 5000$ a
month!�)
3. Your subject line must match the body of your
email
These rules only apply to Confirmation Emails. If it
meets these rules, it will be approved and will be sent out to
all future pending contacts. If it does not meet these rules,
it will be declined and an email will be sent to you requesting
that you change something in the email and resubmit it for
approval.
7. The Opt-in and Opt-out links and instructions will be placed
at the bottom of the email you create automatically by the
system when it is sent out.
8. If you do not create your own confirmation email, we will
send out a generic email for you. You can view this email
here.
Why do contacts need to opt-in?
Contacts that have a
Pending
status must first opt in to receiving emails from you before
they will become
Active
members. This prevents accusations of spam on your account
because these contacts have agreed to let you email them. For
more information on spam and anti-spam regulations, you can
visit the following websites:
FTC Can-Spam Act
Spamhaus Spam Information
What to Do Next�
Watch the
Contact
Management
training video.
There are three ways to get a contact�s information into
Response Magic�s Contact Management. If you have a team website
which has a Get More Information Form, or you have your own
website for which you have
Generated a
Sign-Up Form,
contacts can fill out these forms and their information will
automatically be added to Response Magic for you. If you have
purchased leads, either from
Live Leads
or from another source, you can import the leads using the
Import
Wizard.
You can also add a contact manually.
To add a contact manually, first Select a List to Manage Below
to choose what list you want this contact to be added into.
Then, go to Contact Management. There is a button that says
�Add a Contact�. Clicking this will bring you to a blank
Contact Details sheet which you can then fill out with the
contact�s information. There are two options at the bottom.
1.If you click Yes to Activate, that contact will
become active and will begin to receive any
sequenced emails
you have set up for that list. If you choose No, that contact
will become Archived and will not receive the sequenced emails
you have set up for that list. You can activate archived
contacts at anytime by clicking on the red dot next to their
name in Contact management.
2. Send Automated Response give you the option of if
you would like to send them the email you have created under
Automated Response in Email Management, such as a welcome letter
to this contact.
Once you have several contacts in your list, you may notice that
some are a different color, or Status. Response Magic has four
contact status states, marked by the use of the different
colors.
1.
Green
contacts/Active: contacts that have opted in and are receiving
your sequenced emails.
2.
Red
contacts/Archived: contacts that have previously opted in and
were at one time Active contacts. These contacts have received
all
3.
Orange
contacts/Pending: contacts that have not yet opted in to
receiving emails from you account. These contacts will not
receive emails from your list until they have opted in. You can
send Pending contacts the confirmation email by clicking on the
orange icon.
4.
Gray contacts/Bounced: this means that the email address listed
in the
contact�s detail sheet is an invalid address. Many times, you
can go into a Bounced contact�s detail sheet and correct this
error. One example would be a contact�s email reading bob@yaho.com
instead of bob@yahoo.com. You can correct this and reactivate
the contact.
There are four ways to email your Active or Archived Contacts.
1. You can email them individually by going into
Contact Management and selected Email from the drop-down menu
across from their name. This is explained in the
Contact
Management
training video.
2. You can send emails to groups of contacts using the
Broadcast
function.
3. You can send emails to groups of contacts by using
Saved Emails
4. You can set up Sequenced Emails for your contacts in
specific lists to receive.
Setting up your Sequenced Emails or your Email
Campaigns
1. Watch the
Email Management
training video.
2. Select a List to Manage Below.
3. Go into Email Management for that list.
4. Click on Add HTML Message.
What is the difference between HTML and Text message?
5. Wait for the Email Editor to load.
6. Type in a Subject Line, the number of days, and fill
out the body of the email.
7. When you are done creating your email, click the
Preview button to view how your email will look to your contacts
when it is received. Any errors will be highlighted in red.
8. Close the preview panel, correct any errors there
may have been, then click Save to add the email to you sequence
email list.
Scheduling Appointments with your Contacts
1. Watch the
Scheduling
Appointments
training video.
There are two ways to schedule appointments with your contacts
using Response Magic�s built in scheduling system.
A: 1. Go into Contact Management and select the contact you
would like to make an appointment. You can use the Search
feature to find them more quickly if you have many contacts in a
list.
2. Once you have located the contact you would like to
make an appointment with, use the drop down menu across from
their name and select �schedule�. This will bring you to
Response Magic�s scheduling system.
3. Choose the Date by clicking on the day in the
calendar.
4. Choose the time by selecting the 30-min increment.
5. This will take you to the �Scheduling Next Activity�
Page. Insure that the correct contact�s information is
displayed.
6. Choose how long you think the appointment will
last, if you would like an email reminder about the appointment,
what type of appointment it is, assign the task a subject line,
and then write a description for the appointment if you choose
to do so. Click the Add button to add the appointment to your
calendar.
B. 1. Go to �My Schedule�
2. Choose the Date by clicking on the day in the
calendar.
3. Choose the time by selecting the 30-min increment.
4. Choose the contact you wish to make an appointment
with.
5. Choose how long you think the appointment will last,
if you would like an email reminder about the appointment, what
type of appointment it is, assign the task a subject line, and
then write a description for the appointment if you choose to do
so. Click the Add button to add the appointment to your
calendar.
Advanced Response Magic Functions
Watch the
Saved Emails Training Video
You can create template emails that you can store and
then send to one contact or multiple contacts. Go to Emails
then
Saved
Emails.
Once you have added an email to your Saved Emails, you can then
send it directly from Saved Emails, or you can choose to use it
when you are sending out a broadcast or sending an email to a
contact. To use a saved email when broadcasting or emailing an
individual contact, simply select �use existing� in the email
options instead of �create new�. For more information on using
Saved Emails, see the section on
Broadcasts.
You can test all emails that you have created in your Saved
Emails or in your Sequenced Emails by going to Emails then
Test
Emails.
1. Fill out the information form to test the email variables.
2. Select which emails you would like to test. You can send
yourself 10 emails at a time.
3. Click the �Test Emails� folder to email them to yourself.
Response Magic�s Broadcast function allows you to send an email
to a list of contacts. You can set the broadcasts up to go out
immediately or on a future date.
1. Watch the
Broadcasting
Emails
training video.
2. To send a Broadcast, go to Broadcasts then
Send
Broadcast
3. This brings you to the Broadcast Options page. Follow the
options on this page to create and send your broadcast. Please
be aware that once a broadcast has been set up to be sent out,
it can not be changed or stopped.
The My
Broadcasts page will show you all Broadcasts you have that are
set to be sent, are currently being sent, and that have
previously been sent. You can also view your Link Tracking
data from the My Broadcast Page.
Please refer to the
Broadcasting features Training Video
Response Magic can track both how many people click on the links
in your Broadcast, as well as which specific person clicked on
the links. This feature is only available for Broadcasts
and is not enabled for Sequenced emails.
To Enable Link Tracking for your account, go to Settings, then
Personal Settings. Look for the Enable Link Tracking
option and place a checkmark in the box provided. Click
Update.
To view the tracked-link data for a sent Broadcast, go to
Broadcasts then My Broadcasts. Look under the Broadcast
History section. Click on a Broadcast Title in Broadcast
History to view the link tracking details.
Link Tracking information will also be displayed in a contact's
Link History if they have clicked on a link in a Broadcast that
you have sent to them. You can view this history by
locating the contact in Contact Management and viewing their
Contact Details Sheet by clicking on the contact's name.
When a Pending contact chooses to opt-out of receiving emails
for you, or when an active contact decides they wish to
unsubscribe from your mailing list, they are taken out of your
Contact Management and are placed in your Opt-Out Management.
You can view the Opt-out management for a specific list by going
to List Management, Selecting a List to Manage Below, then going
to Opt-Out Management. You can see the opt-outs from every list
as a group if you go to Tools then
Opt
Outs. Opt-Out management will show you the person�s name, their
email address, and the email on which they chose to opt out of
unsubscribe from receiving emails from you.
Response Magic Tools
The Import Wizard in Response Magic allows you to upload your
contact lists from other programs and your purchased leads list
into a selected list in your Response Magic account. The file
must be in .csv (comma separate value) format, a format most
commonly associated with Microsoft Excel.
1. Watch the
Import Wizard
training video.
2. Go to Tools then
Import
Wizard to begin.
3. Hit the �Browse� button to locate the .csv file on your
computer. Note, if you received this file in an email as an
attachment, you must first save the attachment from your email
onto your computer.
4. If the file is uploaded successfully, you will be taken to
step 2 of the wizard which asks you to establish the field
order.
5. If you do not see this, or you received an error when you
tried to upload, please see the .csv file help guide
here.
6. Once it is uploaded successfully, use the drop down menus to
assign category ids to the information in your .csv file. This
will be done with the first contact only, and applied
automatically to the remaining contacts. If a category on your
.csv file does not have a matching category in the drop down
menu, such as �income expectations� you can use the Custom 1,
Custom 2, ect. in the drop down menu to stand for those fields.
Once all categories are assigned, click the Continue button.
7. Next you will see the Import Options page. Select your
options, choose what List you want these contacts to be
imported, and then click �Submit Import�.
Refer to the
training video on
Response Magic Tools
You can use customized statuses in Response Magic to help
organize your contacts within a list. You can assign a
different status to each contact, and you can create customized
statuses according to your organizational needs.
1. To create, alter, or delete customized statuses to your
Response Magic account, go to Tools then
Customize
Status.
2. To change a contact�s status, you can go to Contact
Management, select the contact, and then use the drop down menu
under Status to alter the status of that contact. You can also
change the status of your contacts when you are scheduling an
appointment with them.
Refer to the
training video on
Response Magic Tools
You can use Response Magic�s Generate Sign-Up Form Wizard to
create a lead-generating form. You can place this sign up form
on a website you own, or in an email you can send to possible
prospects. This form will take the information they fill out
and email it to you, then it will add then automatically to the
Contact Management for the List you specify.
1. Go to Tools then
Generate
Sign Up
2. Choose what List you want the contacts to go into that fill
out this form.
3. Title your form
4. Select the email address where the contact�s information will
sent to when they will out the form.
5. Choose which options you would like displayed on the form for
people to fill out.
6. Choose the URL you would like the person redirected to once
they successfully fill out the form.
7. Select if you would like to be emailed the form-generated
information or if you would not like to have that notification
emailed to you.
8. Click Submit Form to generate the sign-up code.
9. You will be redirected to a page which shows you three
things:
1: What the form will look like when it is placed on your
website
2: The link you can use in your email to send to
potential clients. You must type your text in the email, such
as �Sign-Up Now!� and then highlight that text and change it to
a hyperlink. In most programs you can do this by right clicking
your mouse on the highlighted text and going to Hyperlink or
Hyperlink Options in the menu that appears. In the URL box of
the hyperlink, paste the link code for your sign up form. This
changes �Sign-Up Now!� into �Sign-Up
Now!�
. If your email provider does not let you insert custom
hyperlinks, you can simply paste the link code in your email
with the instructions �please copy and paste this link into your
web browser to sign up to receive my emails� included with the
link.
3. The html code you would place into the code of a
webpage you have created or that is being made for you.
A. What is the difference between an HTML email and a Text
email? An HTML email is an email that uses HTML code, such as
website links, pictures, special fonts, and moving graphics.
The HTML email format is supported by the majority of email
service providers. Text email format only supports basic text,
and does not allow pictures, special fonts or colors, or
clickable links.
Back to Email Management
C. Import Wizard .csv file format help.
A .csv file format is also know as a comma separate
value file, and it is most commonly associated with Microsoft
Excel. If you encounter an error when trying to upload your
.csv file into Response Magic using the Import Wizard, you can
try the following steps to solve the issue.
1. Insure that the file you are using is in .csv
format. It will have the .csv file tag at the end of the name:
example.csv
2. Open the file in Microsoft Excel
3. Insure that there are no blank columns in between
columns that contain information.
See Example
4. Insure that there are no more than 2,000 rows of
contacts in the file.
5. Insure that there are no blank rows between rows
that contain information.
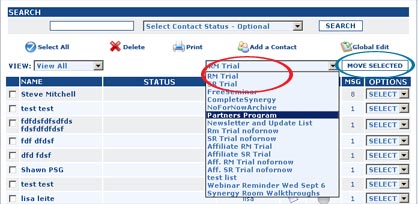
How do I Move a contact
to another list?
How do I copy emails from
list to another?
|
|||||||||||||